When all else fails, organize!

As always, when everything is feeling a little chaotic, I find something to organize. I am FINALLY done sorting through every box in my storage unit. Everything has been relabeled and reorganized and I feel so. Much. Better. I moved a three piece sectional by myself (lifted, stacked it and all that) and that sucker is huge and heavy. However, made me feel pretty good looking around and seeing the progress and feeling like I’ve done it all on my own. May sound silly but in the midst of all that is weighing on me that feeling of triumph that I have done it all by myself really made me feel empowered. It also reminded me that I needed to have a good glass of wine. Doing that now.

However, now I need some new projects to focus on!

I have some tutorials coming soon for a cork board I made and some picture frames. I’m also working on getting my shopping page up and going to keep watching for that. Lots of changes around here and I am pumped for all of them. I will leave you with a picture of my now beautiful and organized storage.

Hope you are having a fab week!

XOXO

20120830-175006.jpg

Never To New To Change It Up A Little

Sorry for my brief absence. I have been doing a lot of thinking about the direction that I want the Bella Mandarin blog to take. I of course love sharing all my tutorials and random tips I come across along the way. I also plan to have a page up here in the near future so you can purchase some of the items that I make. However, I have been really feeling lead to talk more about my life – struggles, triumphs, falls flat on my face and most of all the brokenness that we all experience at some time or another.

I know i’ve only been around a couple of months, but i’ve been planning this blog and business for far longer than I have been posting. Thanks so much to all of my friends and family members who have encouraged me to continue blogging and making crafty items.

My biggest thing right now: finding a job. I recently moved back home as I shared with you before and need to find a job here. I have been searching and applying and praying constantly that I will get that call for that next great opportunity. This is a tough process, I want to be back in the working world and doing something but I want to do something with a purpose and at a place that I feel like I will both contribute to their organization but at the same time grow personally. This is one of those struggles that can easily knock you down but I have faith that God’s plan is bigger and much more purposeful than mine and as long as I do my part with applying and continuing to search, I know he will put  me exactly where he has known I will go.

Another thing that I think a lot of people don’t talk about and they should: depression. The number of people that suffer from various forms of this disease is huge and it can take a very serious toll on your health, relationships and every aspect of your life. This disease took my best friend from me just a couple of years ago. This one moment has shaped and changed the way I think about and do everything. This friend meant so much to me. Was one of the few people I was ALWAYS real with. I miss her and I think about her everyday. There is such a stigma attached to depression and I want to write about it to be real with everyone. This is a very real and serious disease and there is nothing wrong with seeking help, in fact it makes you pretty brave to step forward and take control of something that can have such control over you. I know from personal experience.

I also just got out of an almost three year relationship with a man that I love very much and will always care about. He truly is my best friend. I am so fortunate. It has been a struggle but I know that God has plans for both of us and whether our paths will cross again, only God knows, but no matter how much I know God has it all figured out – it is still tough. You share a lot – laughs, cries, fights, support, etc. and we had some especially tough life things that we went through together and I can tell you that nothing can change that bond and if you are struggling with something like this, just pray. God has given me peace and understanding that he has it all under control I need only focus on what he has for me now.

We all have the times where we are on top of the world but on the flip side we all also have those moments or periods in life where we hit a valley and we aren’t quite sure how we will make it out. Rest assured that God’s got the plans and he will never give you more than you can handle. My sweet friend C told me once “God will never show you Gold and give you Silver” and that runs through my head anytime I feel overwhelmed. It is true.

I appreciate everyone of you who read through my updates and new blog posts and I just feel that it is important to share things close to my heart while also sharing recipes, crafts and helpful ideas. That is what friends do after all – the good the bad and the in between.

XOXO

Welcome Bear to Bella Mandarin – The Cutest Dog Ever!

Ok, so I realized recently that my blog has totally been lacking something and I cannot believe that I have kept you from all the cuteness and amazingness that is my sweet Old English Sheepdog puppy (not so much a puppy, he’s 5, but I still think he’s a puppy).

I would like to introduce you to Bear.

I named him Bear because 1. I went to Baylor and love my Baylor Bears and 2. I love having a dog named after another animal or the sound that an animal makes i.e. the pig named Moo from Uptown Girls.

Here are a bunch of pics of my sweet nugget over the last 5 years. I love this dog so much and he has a hilarious personality. I can’t believe I haven’t talked about him until now but don’t you worry, he will make a regular appearance on Bella Mandarin.

This is the first pic I ever saw of him when he was still at the breeder. He is the one on the right. Notice that his tongue is always sticking out a tiny bit in his puppy pics. Also check out those paws. He grew into them, that’s for sure.

This is the first pic I took with Bear when I first brought him home.

He likes to lay like a frog – from day one when I got him and even now.

The face that never gets in trouble. He’s just too cute.

Bear trying to look serious for our christmas pic.

And more recently – he found a stuffed lamb in the house and he wanted to keep it and play with it so he carried it around with him and looked at me like he knew he shouldn’t have it but he just loved it so much.

And one last picture of him laying on the love seat. He literally takes up the entire love seat.

So he’s huge and hairy and friends with everyone ever. All the kids in the neighborhood come running to see him if they are out playing while he is on a walk. People often stop to tell me “that dog looks like a teddy bear” and that he “doesn’t look real.” I can assure you, he is 100 pounds of real, ridiculous and cute and makes me laugh all the time. Yup. I am obsessed.

XOXO

WDITOT Wednesday: Avoiding a Suitcase Travel Explosion

Yup, two days in a row! I promise, I’m back on my blogging roll and won’t leave you hanging in between. Don’t forget to follow my blog and leave some comments – I LOVE comments, questions, random posts, etc.

On to Why Didn’t I think of that Wednesday (WDITOT Wednesday as we fondly call it around here).

I find that after several bad experiences with hair conditioner/body lotion/shaving cream etc. exploding in my suitcase, I am SUPER paranoid and like bag all of my toiletries when I am traveling now. This tip from a study abroad website is GENIUS! Place plastic wrap over the top of your bottle caps and then screw the lid shut. DUH!

They also have several other great packing tips on the website. Check it out. Now… I just need to plan a trip so I can use this awesome idea.

I have more projects and updates coming soon. Also, I added some new boards to the inspiration board section, check ’em out! Need some ideas for an upcoming project? I’d love to help, just shoot me an email at BellaMandarinBlog @ gmail.com or leave a comment.

Happy Hump Day! XOXO

The Dreaded Move and Address Post Tutorial!

So I FINALLY moved all of my stuff – of course I totally put this off for a while since I was dreading the process. Little did I realize that the thing I should have been dreading the most is going through it all once it was moved back into a new storage unit. I decided it would make more sense to wait and go through it once I got it all up here so I could take my time. I don’t even know how I could accumulate so much stuff. However, I am starting to feel a little more organized. I have almost finished going through all of the boxes/bags/etc. and re-packing everything for an extended storage stay.

I am so thankful for my movers – however I am not thankful that they are much taller and stronger than I am and opted to put some very heavy things very far up. So far I have injured my shoulder, twisted my back and done lord knows what to my neck. Yes, I am whining.

Thankfully I have a climate controlled unit so I have some relief from the heat but I definitely get a workout and a good sweat moving all that stuff. Here is a pic of my organized chaos. These pictures don’t even do it justice because this was after two days of cleaning things out.

I finally feel like I am making progress in there and have made many more goodwill trips. I am on a first name basis with my friends over there. I have totally resisted the temptation to go in and look at things in the store but I have seen some awesome items in their drop off piles when I pull up. Furniture that just screams at me to rescue it and paint it. However, that would just be silly of me right now considering all the stuff I am getting rid of.

So, I had to settle on another DIY. I have been wanting to make this for a while now so it has temporarily fed my DIY needs. I recently made an adress sign for my parents house, the painted numbers on the curb are really faded and unless you know exactly where to look, you cannot see the numbers on the side of the house. I decided to make something like I saw here at 9 o’clock Dance of Joy here is a pic of their version:

I used  a 4×4 fence post that I picked up from Lowe’s for about $5, then I got a 5×5 square and two approximately 6×6 squares from Hobby Lobby – you can cut these yourself but I liked the rounded edges and they were like $1 each so I figured that was a cheap solution. Then I got a wooden sign and iron letters from Hobby Lobby – spent about $20 total at Hob Lob and then $5 at Lowe’s so the whole project was just $25.

I had some leftover black paint from my mirror project and also already had a can of primer and a small can of white paint for the sign. Also, I used chain I had to connect the sign to the post. Don’t forget to pick those up if you don’t have any lying around. I also had some screws for the numbers I bought at hobby lobby, they didn’t come with screws so pick those up too if you need them.

First, I cut down the 4×4 post to 36 inches. You can make two of these posts – DIY with a friend!
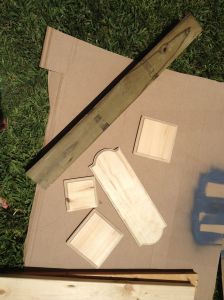
Then I primed all the pieces front and back

I painted the sign white and added eye hooks to it to put my chain on – my #’s are iron and I wanted them to stand out.

I taped off the sign to be sure that the numbers were centered then laid out my numbers and marked the places where the screws would need to be.

Then I removed the numbers and drilled small holes on those markings so that I can lay the numbers down and screw them in with a screw driver. You can see the holes above.

I spray painted the edges of the pieces blue so that I can run over it with some sand paper and have a little of the blue show through when I am done. Since I am painting these black, I didn’t worry about being precise at all. Just sprayed lines randomly.

I painted all the pieces black. I also drilled a hole in each corner of the base 6×6 square as well as two holes toward the center. The holes on each corner are for stakes to go into. I am putting the sign in the front garden area and want it to stay in place. The middle holes are for screws to attach the base to the 4×4. I also drilled two holes in the top 6×6 base for the same reason.

Then I attached the bottom piece and top piece with screws. I used 4″ screws and made sure they were all the way down so I could put wood filler in there to make the area flat again before I put on a final coat of black paint.

Then, I added a large eye hook to the center of the post. Since this is for house numbers and a more permanent sign, I used the eye hook. If you want to be able to change the sign out you might just want to use a hook or a knob. I also screwed in the top 5×5 piece.
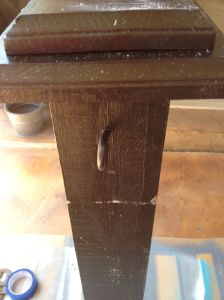
Then I screwed the numbers onto the sign – the first and the last number are edited out of the below pic for privacy reasons but the numbers are all evenly spaced.

Then I added a black chain to the two top pieces of the numbers sign. I also gave the post one more coat of black paint and caulked in the edges at the base as well as at the top. I used clear caulk. I only did this because this sign won’t be under a covered area so I just wanted to protect it as much as possible. I figure the caulk leaves less space for water to get in and rot the post. May or may not make any difference, just sounded good to me.

Here it is – almost finished!

I took it out to the front and placed it in the front flower bed close to the walkway. I added the stakes in the four corners, you can see them poking out. Then I used a rubber mallet to push the stakes all the way in. In Texas we get random weather and some crazy wind at times. These stakes are each a foot long and probably overkill but I wanted to help prevent it from blowing over.


Now people can actually see our house number from the street – we’ve had a lot of neighbors comment on how much they like the sign, the mailman and UPS/FedEx guy said it would be awesome if more people had more easily legible numbers. My parents love how it turned out.

I still may make some signs that can be changed out for special occasions – parties, christmas, etc.

Have you guys done any fun DIY projects lately? I promise now that I am moved I will be back more frequently! Check back tomorrow for a new WDITOT Wednesday post.

XOXO

Catching up & Spare Bedroom Reveal!

I apologize for my recent MIA status – I have been crazy busy and sick and all that jazz. Blah blah, but i’m back and I have some awesome new stuff to share with you!

First, I finally scheduled my move and will be moving things next week so that means I have a whole storage unit to go through but I am super excited to get some of my craft items out of storage which means you may see a crazy surge in projects, but I’ve been missing all my stuff and now that I have finished the spare bedroom/craft room/sewing room and gotten that all updated I am totally excited to cross off some of the projects on my list.

So you guys saw a sneak peak at the cornice box for the spare bedroom last week but as I mentioned, I wanted a little something to jazz it up. I found the perfect thing. So without further delay – I’m totally pumped to share the WHOLE bedroom with you!

Let me remind you of what it was looking like before:

Cluttered, messy and a total dumping ground. After a million  enough trips for the Goodwill folks to remember me each time, we donated a bunch of stuff and got this room ready for some reorganizing. The whole update only cost about $150 – some new bedding and pillow covers, a couple of decorative items and the rest was just some careful shifting of items that were already lurking around the house.

So here is the final product

Here is a close up of the key I added to the middle of the cornice box

Lantern, books and an alarm clock on top of the chest. A TV might be going there in the near future. 

2 part desk area with tons of shelves for storage. 

The main part of the desk – can use both desks for sewing or crafts, etc. etc. 

Found an awesome clock for $14 at ross and then made the cork board below it. Tutorial on that to come. 

Got an awesome deal on a lamp at Kirkland’s – covered over the side table with scrapbook paper and mod podge and added a handle – tutorial for that coming up too. One more pic of my favorite part of the room

I love the nautical feel of the bedroom and I also love that a lot of the items were repurposed – the frames on the wall have these awesome coastal town pictures in them. I repainted the 80’s frames they were in and then painted the mats as well. I already had all those supplies so that was totally free. It is easy to get creative once you start rolling and know you have a limited budget.

My parents are totally happy with their spare bedroom makeover and are so glad it isn’t the family dumping ground anymore. Do you guys have rooms that end up being a dumping ground? You just kind of shut the door and pretend it isn’t there?

Have a fantastic weekend!

XOXO